|
If you cannot see the box below correctly, please check the
font setting of your browser.
※固定ピッチフォントには、MS
ゴシックを指定してください。
+----------+
|          |
|          |
|          |
|          |
+----------+
|
First of all, you must have a library for AFP overlay source. So, you'd create it
beforehand. (ex. TSTSRC)
Start the Advanced Function Printing Utilities (AFPU) by STRAFPU.
AFPU IBM Advanced Function Printing Utilities for AS/400 Select one of the following Overlay Utility
1. Work with source overlays
2. Work with source overlay files Print Format Utility
11. Work with PFD definitions
12. Work with PFD definition files
13. Print database file member
14. Print AFP Utilities tutorial Resource Management Utility
21. Convert to page segment
22. Work with overlays
23. Work with page segments Selection or command
===> 2 F3=Exit F4=Prompt F9=Retrieve F12=Cancel F16=System main menu
|
Select 2 (Work with source overlay file).
Work with Source Overlay Files Type choices, press Enter. Library . . . . . . . . . . . TSTSRC Name, *USRLIBL, *LIBL
*CURLIB, *ALLUSR, *ALL
File . . . . . . . . . . . . . *ALL Name, generic*, *ALL
 Parameters or command
 ===>
 F3=Exit   F4=Prompt   F5=Refresh   F9=Retrieve   F12=Cancel
|
Now I make a new file (TSTOVL) for this demonstration.
Work with Source Overlay Files Library . . . . . . . . . TSTSRC Name, *USRLIBL, *LIBL, *CURLIB...
File . . . . . . . . . . *ALL Name, generic*, *ALL
Position to . . . . . . . Starting characters Type options, press Enter.
1=Create 2=Change 3=Copy 4=Delete 7=Rename 8=Display description
12=Work with source overlays Opt File Library Text Changed QOVLSRC TSTSRC Source overlay file 04/12/00
                                                                         Bottom
 Parameters or command
 ===>
 F3=Exit   F4=Prompt   F5=Refresh   F9=Retrieve   F11=Display names only
 F12=Cancel
|
Put 1 to the Option and fill the name of the file and the library, and put the enter
key.
Work with Source Overlay Files Library . . . . . . . . . TSTSRC Name, *USRLIBL, *LIBL, *CURLIB...
File . . . . . . . . . . *ALL Name, generic*, *ALL
Position to . . . . . . . Starting characters Type options, press Enter.
1=Create 2=Change 3=Copy 4=Delete 7=Rename 8=Display description
12=Work with source overlays Opt File Library Text Changed
1 TSTOVL TSTSRC
QOVLSRC TSTSRC Source overlay file 04/12/00
                                                                         Bottom
 Parameters or command
 ===>
 F3=Exit   F4=Prompt   F5=Refresh   F9=Retrieve   F11=Display names only
 F12=Cancel
|
And fill the description of the file on the next screen.
Create Source Overlay File File . . . . . . . . . . . . TSTOVL
Library . . . . . . . . . TSTSRC Type choices, press Enter. Text 'description' . . . . . Authority . . . . . . . . . *LIBCRTAUT Name, *LIBCRTAUT, *ALL
*CHANGE, *EXCLUDE, *USE
F3=Exit F5=Refresh F12=Cancel
|
Now you have a new file for overlay definition. This file isn't a source file but
just a physical file.
Opt File Library Text Changed
QOVLSRC TSTSRC Source overlay file 04/12/00 |
You can add the source overlay member on this screen like a PDM.
Work with Source Overlays File . . . . . . . . . . TSTOVL Name, F4 for list
Library . . . . . . . . TSTSRC Name, *LIBL, *CURLIB
Source overlay . . . . . *ALL Name, generic*, *ALL
Position to . . . . . . . Starting characters Type options, press Enter.
1=Create 2=Change 3=Copy 4=Delete 6=Print 7=Rename
9=Create overlay Source
Opt Overlay Text Changed
(No source overlays in file)
Bottom
Parameters or command
===>
F3=Exit F4=Prompt F5=Refresh F9=Retrieve F11=Display names only
F12=Cancel
|
Work with Source Overlays File . . . . . . . . . . TSTOVL Name, F4 for list
Library . . . . . . . . TSTSRC Name, *LIBL, *CURLIB
Source overlay . . . . . *ALL Name, generic*, *ALL
Position to . . . . . . . Starting characters Type options, press Enter.
1=Create 2=Change 3=Copy 4=Delete 6=Print 7=Rename
9=Create overlay Source
Opt Overlay Text Changed
1 TESTOVL (No source overlays in file)
Bottom
Parameters or command
===>
F3=Exit F4=Prompt F5=Refresh F9=Retrieve F11=Display names only
F12=Cancel |
↓
Create Source Overlay File . . . . . . . . . . . . TSTOVL
Library . . . . . . . . . TSTSRC
Source overlay . . . . . . . TESTOVL Type options, press Enter.
1=Select Opt Action
Define overlay specifications
Work with source overlay fonts
1 Design overlay
F3=Exit F5=Refresh F9=Select all F12=Cancel
|
There are 3 actions like below and the most important actions is "Design
overlay".
Create Source Overlay File . . . . . . . . . . . . TSTOVL
Library . . . . . . . . . TSTSRC
Source overlay . . . . . . . TESTOVL Type options, press Enter.
1=Select Opt Action
Define overlay specifications
Work with source overlay fonts
1 Design overlay
F3=Exit F5=Refresh F9=Select all F12=Cancel
|
There comes a blank screen like below. You can define texts, boxes or lines here by
taking 3 steps to define them.
1) Position the cursor where you want to set a text or a line or a box.
2) Push F6 (Text) or F9 (Line) or F10 (Box)
3) Push Enter for the text, or F9 for the line, F10 for the box again.
Design Overlay Columns 1- 74
Control . . Source overlay . . . . . TESTOVL
*...+....1....+....2....+....3....+....4....+....5....+....6....+....7....
001
002
003
004
005
006
007
008
009
010
011
012
013
014
015
016
017
More...
F3=Exit F6=Text F9=Line F10=Box
F11=Bar code F21=Element edit F22=Block edit F24=More keys
|
This is a list of function keys on "Design overlay". The keys in red are
important.
F1=Help
Shows the help display according to the cursor
position.
F3=Exit
Exits the Design display.
F5=Refresh
Restores the elements that have been previously
removed by the F16 (Hide) key. This key affects only displaying elements in the image area
of the screen, but does not change the elements you entered.
The elements removed by the remove operation are not
restored. You need to use restore commands for each element in the list view to restore
such elements.
F6=Text
Defines a text element.
F9=Line
Defines a line element. You need to press this key
twice, once to enter the start position and a second time for the end position.
F10=Box
Defines a box element. You need to press this key
twice, once to enter the start position and a second time for the end position.
F11=Bar code
Defines a bar code element.
F13=Place
Places a page segment, graphics, or a record layout
(record layout is possible in the Design Page Layout display only)
F14=Change
Changes an existing element. You need to place the
cursor at that element, then press the F14 key.
F15=Mark on/off
Re-displays or suppresses the element marks on the
image area. This function is useful to verify the entire text, line, or box element
without being overridden by the other element marks.
F16=Hide
Hides the elements one by one at the cursor position.
This function is useful when you want to see those elements that are covered by other
elements.
F17=Switch view
Switches the view, between the screen view and the
list view.
F19=Left
Moves the image area toward the first column.
F20=Right
Moves the image area toward the last column.
F21=Element edit
Starts the element edit operation.
Move the cursor to an element and press F21. Then the
function key area changes and you can perform copy, move, or remove operation on the
element by pressing a function key.
F22=Block edit
Starts the block edit operation.
Move the cursor to the top left corner of the block
area and press F22, then move the cursor to the bottom right corner of the block area and
press F22. The block is shown and the function key area changes, and you can perform copy,
move, or remove operation on the elements in the block by pressing a function key.
Note
For line, box, and graphics elements, the entire
element must be in the block. For other elements, the first asterisk of their marks must
be in the block.
The border lines of block are considered to be in the
block.
F24=More keys
Shows the function key assignments that are not
displayed currently.
|
TEXT
The samples below are definition of text on the "Design overlay". You can not
set the text directly on the screen, but you can do it with F6. When you push the F6 key,
a definition screen for text (The red letters in sample screen below) appears.
Design Overlay Columns: 1- 74
Control . . Source overlay . . . . . TESTOVL
*...+....1....+....2....+....3....+....4....+....5....+....6....+....7....
001
002
003
004 %T001
005
006
007
008
009
010
011
012
More...
Define Text
Mark . . . . . . : *T001 Measurement method . . . . : Row/Column
Position . . . . . Across 10 Down 4
Text data . . . . text is here F3=Exit F4=Detail F6=Change measurement method
F12=Cancel F24=More keys
|
After you set the text in the Text Data Field, push the enter. The screen below means
that there is one text (*T001 s here). *T001 is a kind of control character, and if you
want to change the definition of one text element, you should move the cursor on the
"*T001" first, and, secondly, push F14 or F21 key.
Note
If you push F14 or F21 on the "s here", nothing will happen. You should move
the cursor on the *T001 first and push the F14 or F21.
Pay attention to the position of the cursor on the image below.
This is a sample of "change text". You can define the details of text by F4
(Detail)
Design Overlay Columns: 1- 74
Control . . 11 Source overlay . . . . . TESTOVL
*...+....1....+....2....+....3....+....4....+....5....+....6....+....7....
001
002
003
004 %T001 s here
005
006
007
008
009
010
011
012
More...
Change Text
Mark . . . . . . : *T001 Measurement method . . . . : Row/Column
Position . . . . . Across 10 Down 4
Text data . . . . text is here F3=Exit F4=Detail F6=Change measurement method
F12=Cancel F13=Repeat element F24=More keys
|
F4 ↓
Change Text Detail Mark: *T001 Measurement method: Row/Column Type choices, press Enter. Position:
Across . . . . . . . . . . 10 1-999
Down . . . . . . . . . . . 4 1-999
Text data . . . . . . . . . text is here
Element . . . . . . . . . . Name
Format . . . . . . . . . . . 1 1=Horizontal, 2=Vertical
Degree of rotation . . . . . 0 0, 90, 180, 270
Color . . . . . . . . . . . *DEFAULT *DEFAULT, 1=Blue, 2=Red
3=Magenta, 4=Green, 5=Cyan
6=Yellow, 7=Brown, 8=Black
Underline . . . . . . . . . N Y=Yes, N=No
Overstrike . . . . . . . . . Character Mark: *T001 Measurement method: Row/Column Type choices, press Enter. Font . . . . . . . . . . . . *DEFAULT *DEFAULT, 1-8, F4 for list
Character size:
Width . . . . . . . . . . *DEFAULT *DEFAULT, 0.10-99.99
Height . . . . . . . . . . *DEFAULT *DEFAULT, 0.10-99.99
Bottom
F3=Exit F4=Prompt F5=Refresh F6=Change measurement method F12=Cancel
|
You can adjust the position of text by Measurement method. If you push F6 you can
adjust it by Inch.
Design Overlay Columns: 1- 74
Control . . 11 Source overlay . . . . . TESTOVL
*...+....1....+....2....+....3....+....4....+....5....+....6....+....7....
001
002
003
004 %T001 s here
005
006
007
008
009
010
011
012
More...
Change Text
Mark . . . . . . : *T001 Measurement method . . . . : Row/Column
Position . . . . . Across 10 Down 4
Text data . . . . text is here F3=Exit F4=Detail F6=Change measurement method
F12=Cancel F13=Repeat element F24=More keys
|
F6 ↓
Design Overlay Columns: 1- 74
Control . . 11 Source overlay . . . . . TESTOVL
*...+....1....+....2....+....3....+....4....+....5....+....6....+....7....
001
002
003
004 %T001 s here *L003 ----------
005
006
007 *B002 ------------+
008 : :
009 : :
010 +-----------------+
011
012
More...
Change Text
Mark . . . . . . : *T001 Measurement method . . . . : Inch
Position . . . . . Across .90 Down .50
Text data . . . . text is here F3=Exit F4=Detail F6=Change measurement method
F12=Cancel F13=Repeat element F24=More keys
|
If you push F15, you can see the whole of text except the last one (in this case,
*T003) you set.
Design Overlay Columns: 1- 74
Control . . Source overlay . . . . . TESTOVL
*...+....1....+....2....+....3....+....4....+....5....+....6....+....7....
001
002
003
004 *T001 s here
005
006 *T002 s here
007
008 *T003 s here
009
010
011
012
013
014
015
016
017
More...
F3=Exit F5=Refresh F10=Box F12=Cancel
F15=Mark on/off F16=Hide F19=Left F20=Right
|
F15 ↓
*T001, *T002 are disappeared, and the last one (*T003) remains.(I don't know why…)
Design Overlay Columns: 1- 74 Control . . Source overlay . . . . . TESTOVL
*...+....1....+....2....+....3....+....4....+....5....+....6....+....7....
001
002
003
004 text s here
005
006 text is here
007
008 *T003 s here
009
010
011
012
013
014
015
016
017
More...
F3=Exit F5=Refresh F10=Box F12=Cancel
F15=Mark on/off F16=Hide F19=Left F20=Right
|
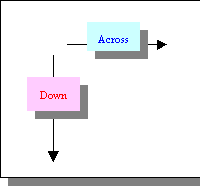
BOX
You can make a box easily by F10. And you should know the word meaning of
"across" and "down" first.
- The horizontal line is defined by "across" (start position, end
position).
- The vertical line is defined by "down" (start position, end position).
Design Overlay Columns: 1- 74
Control . . Source overlay . . . . . TESTOVL
*...+....1....+....2....+....3....+....4....+....5....+....6....+....7....
001
002
003
004 *T001 s here
005
006
007 %B002 ------------+
008 : :
009 : :
010 +-----------------+
011
012
More...
Define Box
Mark . . . . . . : *B002 Measurement method . . . . : Row/Column
Start position . . Across 23 Down 7
End position . . . Across 41 Down 10 F3=Exit F4=Detail F6=Change measurement method
F12=Cancel F24=More keys
|
If you want to make a box, push F10. First, F10 defines the first corner of box. And
move the cursor to the opposite corner and push F10 again. The screen below is the snap
shot of the first F10. If you want to cancel it, push F12.
Design Overlay Columns: 1- 74
Control . . Source overlay . . . . . TESTOVL
*...+....1....+....2....+....3....+....4....+....5....+....6....+....7....
001
002
003
004 *T001 s here
005
006
007 %B002
008
009
010
011
012
013
014
015
016
017
More...
F3=Exit F5=Refresh F10=Box F12=Cancel
F15=Mark on/off F16=Hide F19=Left F20=Right
Specify opposite corner of box and press F10. |
The screen below is the snap shot of the second F10. There is a definition screen on
the bottom of screen. If you want to cancel it, push F12, and if it's OK, push enter.
Design Overlay Columns: 1- 74
Control . . Source overlay . . . . . TESTOVL
*...+....1....+....2....+....3....+....4....+....5....+....6....+....7....
001
002
003
004 *T001 s here
005
006
007 %B002 ------------+
008 : :
009 : :
010 +-----------------+
011
012
More...
Define Box
Mark . . . . . . : *B002 Measurement method . . . . : Row/Column
Start position . . Across 23 Down 7
End position . . . Across 41 Down 10 F3=Exit F4=Detail F6=Change measurement method
F12=Cancel F24=More keys
|
Push enter to complete it.
Design Overlay Columns: 1- 74
Control . . Source overlay . . . . . TESTOVL
*...+....1....+....2....+....3....+....4....+....5....+....6....+....7....
001
002
003
004 *T001 s here
005
006
007 *B002 ------------+
008 : :
009 : :
010 +-----------------+
011
012
013
014
015
016
017
More...
F3=Exit F5=Refresh F9=Line F12=Cancel
F15=Mark on/off F16=Hide F19=Left F20=Right
|
LINE
You can make a line easily by F9.
If you want to make a line, push F9. First, F9 defines the start position of the line. And
move the cursor to the end position and push F9 again. The screen below is the snap shot
of the first F9. If you want to cancel it, push F12.
Design Overlay Columns: 1- 74
Control . . Source overlay . . . . . TESTOVL
*...+....1....+....2....+....3....+....4....+....5....+....6....+....7....
001
002
003 %L001
004
005
006
007
008
009
010
011
012
013
014
015
016
017
More...
F3=Exit F5=Refresh F9=Line F12=Cancel
F15=Mark on/off F16=Hide F19=Left F20=Right
Specify opposite end of line and press F9.
|
The screen below is the snap shot of the second F9. There is a definition screen on the
bottom of screen. If you want to cancel it, push F12, and if it's OK, push enter.
Design Overlay Columns: 1- 74
Control . . Source overlay . . . . . TESTOVL
*...+....1....+....2....+....3....+....4....+....5....+....6....+....7....
001
002
003 %L001 ----------------
004
005
006
007
008
009
010
011
012
More...
Define Line
Mark . . . . . . : *L001 Measurement method . . . . : Row/Column
Start position . . Across 10 Down 3
End position . . . Across 31 Down 3 F3=Exit F4=Detail F6=Change measurement method
F12=Cancel F24=More keys
|
Push enter to complete it.
Design Overlay Columns: 1- 74
Control . . Source overlay . . . . . TESTOVL
*...+....1....+....2....+....3....+....4....+....5....+....6....+....7....
001
002
003 *L001 ----------------
004
005
006
007
008
009
010
011
012
013
014
015
016
017
More...
F3=Exit F6=Text F9=Line F10=Box
F11=Bar code F21=Element edit F22=Block edit F24=More keys
|
Block edit
You can COPY/MOVE/REMOVE the group of element by F22. They call it "Block
Edit". The first F22 define a corner of block area. And you should push F22 again at
the opposite corner.
Design Overlay Columns: 1- 74
Control . . Source overlay . . . . . TESTOVL
*...+....1....+....2....+....3....+....4....+....5....+....6....+....7....
001
002
003 %
004 *T001 s here *L003 ----------
005
006
007 *B002 ------------+
008 : :
009 : :
010 +-----------------+
011
012
013
014
015
016
017
More...
F3=Exit F5=Refresh F12=Cancel F15=Mark on/off
F16=Hide F19=Left F20=Right F22=Block edit
Specify opposite corner of block and press F22. |
The screen below is a kind of suspense mode of the block edit. You can Copy (F6), Move
(F9), Remove (F10) on this screen.
* Pay attention to the lower part of screen. The function list was changed.
Design Overlay Columns: 1- 74
Control . . Source overlay . . . . . TESTOVL
*...+....1....+....2....+....3....+....4....+....5....+....6....+....7....
001
002
003 %==============================================
004 = *T001 s here *L003 ---------- =
005 = =
006 = =
007 = *B002 ------------+ =
008 = : : =
009 = : : =
010 = +-----------------+ =
011 ===============================================
012
013
014
015
016
017
More...
F3=Exit F6=Copy F9=Move F10=Remove
F12=Cancel F19=Left F20=Right F24=More keys
Specify destination, press F6, F9, or F10. |
This is a list of function keys in the Block Edit mode.
F1=Help
Shows the help display according to the cursor
position.
F3=Exit
Exits the current operation and displays the previous
display.
F5=Refresh
Restores the elements that have been previously
removed by the F16 (Hide) key. This key affects only displaying elements in the image area
of the screen, but does not change the elements you entered.
F6=Copy
Copies the element or multiple elements to the desired
position.
F9=Move
Moves the element or multiple elements to the desired
position.
F10=Remove
Removes the element or multiple elements.
F12=Cancel
Cancels current operation and displays the previous
screen.
F15=Mark on/off
Re-displays or suppresses the element marks on the
image area. This function is useful to verify the entire text, line, or box element
without being overridden by the other element marks.
F16=Hide
Hides the elements one by one at the cursor position.
This function is useful when you want to see those elements that are covered by other
elements.
F19=Left
Moves the image area toward the first column.
F20=Right
Moves the image area toward the last column.
|
Control field
You can use Control field like the one as in WRKSPLF screen.If you want to display the
data from line 11, set "11" in the Control field and push enter.
Design Overlay Columns: 1- 74
Control . . 11 Source overlay . . . . . TESTOVL
*...+....1....+....2....+....3....+....4....+....5....+....6....+....7....
001
002
003
004 *T001 s here *L003 ----------
005
006
007 *B002 ------------+
008 : :
009 : :
010 +-----------------+
011
012
013 *T004 s here *L006 ----------
014
015
016 *B005 ------------+
017 : :
More...
F3=Exit F6=Text F9=Line F10=Box
F11=Bar code F21=Element edit F22=Block edit F24=More keys |
So you can see the data from line 11.
Design Overlay Columns: 1- 74
Control . . 11 Source overlay . . . . . TESTOVL
*...+....1....+....2....+....3....+....4....+....5....+....6....+....7....
011
012
013 *T004 s here *L006 ----------
014
015
016 *B005 ------------+
017 : :
018 : :
019 +-----------------+
020
021
022
023
024
025
026
027
More...
F3=Exit F6=Text F9=Line F10=Box
F11=Bar code F21=Element edit F22=Block edit F24=More keys |
NOTE
You better clear the Control field after you used it.
This is a list of option for Control,You may move the image area by entering one of the
following commands in this field and pressing Enter:
-n
Backward
The image area moves n lines toward the top line.
+n
Forward
The image area moves n lines toward the bottom line.
W-n
Backward
The image area moves n columns toward the first
column.
W+n
Forward
The image area moves n columns toward the last column.
N
The image area moves to the nth line.
Wn
The image area moves to the nth column.
*TOP
The image area moves to the first line.
*BOT
The image area moves to show the last line.
*VIEW
A simulated printout will be displayed on the
workstation.
The Overlay Utility will create a temporary overlay
which can be accessed by the Client Access AFP Workbench Viewer. A command will be sent to
the workstation to start the AFP Workbench Viewer. Another PC window will be created and
the AFP Workbench Viewer will attempt to display the temporary overlay.
The workstation must be a programmable workstation and
attached to the AS/400 system with Client Access for OS/400 V3R1M3 or later. The Client
Access Workbench Viewer must also be installed. The USED specified in the Client Access
configuration to access the AS/400 must be the same as that used to sign on to the AS/400
session or have all object authority. If not, "message CPF2189, Not authorized to
object ... ", will be returned. The maximum number of times the *VIEW command can be
used while designing an overlay is 25.
|
Change Line
You can change the definition of line by F14. And you can define the details of line
definition by F4.
Design Overlay Columns: 1- 74
Control . . 11 Source overlay . . . . . TESTOVL
*...+....1....+....2....+....3....+....4....+....5....+....6....+....7....
001
002
003
004 *T001 s here %L003 ----------
005
006
007 *B002 ------------+
008 : :
009 : :
010 +-----------------+
011
012
More...
Change Line
Mark . . . . . . : *L003 Measurement method . . . . : Row/Column
Start position . . Across 32 Down 4
End position . . . Across 47 Down 4 F3=Exit F4=Detail F6=Change measurement method
F12=Cancel F13=Repeat element F24=More keys
|
F4↓
Change Line Detail Mark: *L003 Measurement method: Row/Column Type choices, press Enter. Start position:
Across . . . . . . . . . . 32 1-999
Down . . . . . . . . . . . 4 1-999
End position:
Across . . . . . . . . . . 47 1-999
Down . . . . . . . . . . . 4 1-999
Element . . . . . . . . . . Name
Line type . . . . . . . . . 1 1=Solid, 2=Dashed, 3=Dotted
Line width . . . . . . . . . *MEDIUM *NARROW, *MEDIUM, *WIDE
0.00-1.00
Line placement . . . . . . . 1 1=Middle, 2=Border
F3=Exit F5=Refresh F6=Change measurement method F12=Cancel
|
The most important parameter is "Line Placement". Here is a help text of Line
replacement.
Line placement - HELP
Specify the line placement used to draw the line. This
parameter is used only when the measurement method is Row/Column.
1 Middle
Line is drawn in the middle of character cells.
2 Border
Horizontal line is drawn at the top of character
cells. Vertical line is drawn at the left of character cells.
The default value is 1 Middle. |
If the lines or lines of boxes are drawn on the text line, you should change the
"Line Placement" to 2. Please pay attention to the default value. And you can
move text by it's measurement method inch, also. Generally speaking, Line replacement is
easy to adjust better than measurement method.
ABCDEFGHIJKULMNOPQRSTU↓
ABCDEFGHIJKULMNOPQRSTU |
Define overlay specifications
You can define the form size or default of measurement method here.
Create Source Overlay File . . . . . . . . . . . . : TSTOVL
Library . . . . . . . . . : TSTSRC
Source overlay . . . . . . . : TESTOVL Type options, press Enter.
1=Select Opt Action
1 Define overlay specifications
Work with source overlay fonts
Design overlay
F3=Exit F5=Refresh F9=Select all
|
Define Overlay Specifications Type choices, press Enter. Printer type . . . . . . . . *DEFAULT *DEFAULT, 1 - 9999
Characters per inch . . . . 10.00 5.00, 10.00, 12.00, 13.30, 15.00
16.70, 18.00, 20.00
Lines per inch . . . . . . . 6.00 3.00, 4.00, 6.00, 7.50, 8.00, 9.00
12.00
Degree of rotation . . . . . 0 0, 90, 180, 270
Unit of measure . . . . . 1 1=Inch, 2=Centimeter
Data elements:
Measurement method . . . 1 1=Row/Column, 2=Inch/Centimeter
Size:
Measurement method . . . 1 1=Row/Column, 2=Inch/Centimeter
Width . . . . . . . . . 80 1-999
Height . . . . . . . . . 60 1-999
Offset:
Measurement method . . . 1 1=Row/Column, 2=Inch/Centimeter
Across . . . . . . . . . 0 0-999
Down . . . . . . . . . . 0 0-999
Grid:
Measurement method . . . 1 1=Row/Column, 2=Inch/Centimeter
Across . . . . . . . . . 10 1-999
Down . . . . . . . . . . 6 1-999
F3=Exit F5=Refresh F12=Cancel
|
Work with source overlay fonts. You can define the font set here.
Create Source Overlay File . . . . . . . . . . . . : TSTOVL
Library . . . . . . . . . : TSTSRC
Source overlay . . . . . . . : TESTOVL Type options, press Enter.
1=Select Opt Action
Define overlay specifications
1 Work with source overlay fonts
Design overlay
F3=Exit F5=Refresh F9=Select all
|
There are one default font set and 9 user defined font sets.
Work with Source Overlay Fonts Type options, press Enter.
2=Change 5=Display 9=Set initial font Font
Opt Number Text
*DEFAULT 10 CPI Courier
1 10 CPI Courier
2 10 CPI Courier
3 10 CPI Courier
4 10 CPI Courier
5 10 CPI Courier
6 10 CPI Courier
7 10 CPI Courier
8 10 CPI Courier
Bottom
F3=Exit F5=Refresh F12=Cancel
|
This is a ample of font set.
Change Source Overlay Font Font number . . . . . . . . : 1 Type choice, press Enter. Font type . . . . . . . . . 3 1=Font and character identifier
2=Coded font
3=Code page and font character set
F3=Exit F5=Refresh F12=Cancel
|
Change Source Overlay Font Font number . . . . . . . . : 1
Font type . . . . . . . . . : 3 Code page and font character set Type choices, press Enter. Code page . . . . . . . . . Name, F4 for list
Font character set . . . . . Name, F4 for list
Point size . . . . . . . . . *NONE 0.1-999.9, *NONE
Text 'description' . . . . .
F3=Exit F4=Prompt F5=Refresh F12=Cancel
|
Select Code Page Position to . . . . . . . Starting characters Type option, press Enter.
1=Select Code
Opt Page Library Text
1 T1V10037 QFNTCPL USA/CANADA - CECP
T1V10273 QFNTCPL GERMANY F.R./AUSTRIA- CECP
T1V10274 QFNTCPL BELGIUM - CECP
T1V10275 QFNTCPL BRAZIL - CECP
T1V10277 QFNTCPL DENMARK/NORWAY - CECP
T1V10278 QFNTCPL FINLAND/SWEDEN- CECP
T1V10280 QFNTCPL ITALY- CECP
T1V10281 QFNTCPL JAPAN (LATIN) - CECP
T1V10282 QFNTCPL PORTUGAL - CECP
T1V10284 QFNTCPL SPAIN/LATIN AMERICA - CECP
T1V10285 QFNTCPL UNITED KINGDOM - CECP
T1V10297 QFNTCPL FRANCE - CECP
More...
F5=Refresh F12=Cancel
|
Select Font Character Set Position to . . . . . . . Starting characters
Type option, press Enter.
1=Select Font
Character
Opt Set Library Text
C0D0GB10 QFNTCPL GOTHIC ROMAN BOLD 100 10-PT
C0D0GB12 QFNTCPL GOTHIC ROMAN BOLD 90 10-PT
C0D0GC15 QFNTCPL GOTHIC ROMAN SEMI-CON 70 10-PT
C0D0GI12 QFNTCPL GOTHIC ITALIC 9-PT
C0D0GL10 QFNTCPL GOTHIC ROMAN SEMI-LIGHT 10-PT
C0D0GL12 QFNTCPL GOTHIC ROMAN SEMI-LIGHT 9-PT
C0D0GL15 QFNTCPL GOTHIC ROMAN SEMI-LIGHT 8-PT
C0D0GP12 QFNTCPL GOTHIC PROPORTIONAL ROMAN 9-PT
C0D0GR10 QFNTCPL GOTHIC REVERSE ROMAN 10-PT
C0D0GT10 QFNTCPL GOTHIC ROMAN 10-PT
C0D0GT12 QFNTCPL GOTHIC ROMAN 9-PT
More...
F5=Refresh F12=Cancel
|
Now font set number1 is defined like below. So, I will define it in the text element.
Change Source Overlay Font Font number . . . . . . . . : 1
Font type . . . . . . . . . : 3 Code page and font character set Type choices, press Enter. Code page . . . . . . . . . T1V10037 Name, F4 for list
Font character set . . . . . C0S0CE10 Name, F4 for list
Point size . . . . . . . . . *NONE 0.1-999.9, *NONE
Text 'description' . . . . . USA/CANADA - CECP
F3=Exit F4=Prompt F5=Refresh F12=Cancel
|
Push F14 and F4, you can see the details of text element.
Design Overlay Columns: 1- 74
Control . . Source overlay . . . . . TESTOVL
*...+....1....+....2....+....3....+....4....+....5....+....6....+....7....
001
002
003
004 %T001 s here.
005
006
007
008
009
010
011
012
More...
Change Text
Mark . . . . . . : *T001 Measurement method . . . . : Row/Column
Position . . . . . Across 10 Down 4
Text data . . . . text is here. F3=Exit F4=Detail F6=Change measurement method
F12=Cancel F13=Repeat element F24=More keys
|
Change Text Detail Mark: *T001 Measurement method: Row/Column Type choices, press Enter. Position:
Across . . . . . . . . . . 10 1-999
Down . . . . . . . . . . . 4 1-999
Text data . . . . . . . . . text is here
Element . . . . . . . . . . Name
Format . . . . . . . . . . . 1 1=Horizontal, 2=Vertical
Degree of rotation . . . . . 0 0, 90, 180, 270
Color . . . . . . . . . . . *DEFAULT *DEFAULT, 1=Blue, 2=Red
3=Magenta, 4=Green, 5=Cyan
6=Yellow, 7=Brown, 8=Black
Underline . . . . . . . . . N Y=Yes, N=No
Overstrike . . . . . . . . . Character More…
F3=Exit F4=Prompt F5=Refresh F6=Change measurement method F12=Cancel
|
Push roll/up and you can find the Font parameter. You can define the font set number
here.
Change Text Detail Mark: *T001 Measurement method: Row/Column Type choices, press Enter. Font . . . . . . . . . . . . *DEFAULT *DEFAULT, 1-8, F4 for list
Character size:
Width . . . . . . . . . . *DEFAULT *DEFAULT, 0.10-99.99
Height . . . . . . . . . . *DEFAULT *DEFAULT, 0.10-99.99
Bottom
F3=Exit F4=Prompt F5=Refresh F6=Change measurement method F12=Cancel
|
If you change the font of text, nothing happens on the screen, It is not a WYSIWYG. You
can check the actual font size after print it out.
F16 Hide
If more than 2 elements are located same place and you want to edit the under elements,
you can hide obstacle element by F16. The sample screen below shows *B094,*T016 and *T018.
And there is one more text element '*T012' under the *B094. If you want to change element
of the *T012, you should push F16 on the *B094 to hide itself.
Design Overlay Columns: 38-111
Control . . Source overlay . . . . . PS52R65COK
..4....+....5....+....6....+....7....+....8....+....9....+....0....+....1.
001
002 --------------------------------------------
003
004
005
006 *B094 ----------------+
007 :*T016 r---:*T018 ----:
008 : : :
009 : : :
010 +---------------------+
011 xt. :
012 *T072 . / /--+
013 -*T019 r---:*T020 list-
014 : : :
015 xt. : : : :
016 +----------:----------+
017 *T023 ast Fourth Street, Seymour, IN 47274-4309
More...
F3=Exit F6=Text F9=Line F10=Box
F11=Bar code F21=Element edit F22=Block edit F24=More keys
|
Move the cursor on *B094, and push F16. *B014 is hidden, and *T012 appears.
NOTE
It doesn't mean that *B014 is NOT deleted, but just hidden temporarily.
Design Overlay Columns: 38-111
Control . . Source overlay . . . . . PS52R65COK
..4....+....5....+....6....+....7....+....8....+....9....+....0....+....1.
001
002 --------------------------------------------
003
004
005
006 *T012 sing / /
007 -*T016 r---:*T018 -----
008 :
009 :
010 :
011 xt. :
012 *T072 . / /--+
013 -*T019 r---:*T020 list-
014 : : :
015 xt. : : : :
016 +----------:----------+
017 *T023 ast Fourth Street, Seymour, IN 47274-4309
More...
F3=Exit F6=Text F9=Line F10=Box
F11=Bar code F21=Element edit F22=Block edit F24=More keys |
If you want to display the hidden element again, push the F5.
Design Overlay Columns: 38-111
Control . . Source overlay . . . . . PS52R65COK
..4....+....5....+....6....+....7....+....8....+....9....+....0....+....1.
001
002 --------------------------------------------
003
004
005
006 *T012 sing / /
007 -*T016 r---:*T018 -----
008 :
009 :
010 :
011 xt. :
012 *T072 . / /--+
013 -*T019 r---:*T020 list-
014 : : :
015 xt. : : : :
016 +----------:----------+
017 *T023 ast Fourth Street, Seymour, IN 47274-4309
More...
F3=Exit F6=Text F9=Line F10=Box
F11=Bar code F21=Element edit F22=Block edit F24=More keys
|
F5 ↓
Design Overlay Columns: 38-111
Control . . Source overlay . . . . . PS52R65COK
..4....+....5....+....6....+....7....+....8....+....9....+....0....+....1.
001
002 --------------------------------------------
003
004
005
006 *B094 ----------------+
007 :*T016 r---:*T018 ----:
008 : : :
009 : : :
010 +---------------------+
011 xt. :
012 *T072 . / /--+
013 -*T019 r---:*T020 list-
014 : : :
015 xt. : : : :
016 +----------:----------+
017 *T023 ast Fourth Street, Seymour, IN 47274-4309
More...
F3=Exit F6=Text F9=Line F10=Box
F11=Bar code F21=Element edit F22=Block edit F24=More keys
|
EXIT
This is a screen of exit. If you want to save the data, option is 1.
Exit Overlay Utility Type choices, press Enter. Option . . . . . . . . . . . . . 1 1=Save and exit
2=Exit without saving
3=Resume Overlay Utility session Return to source overlay list . . Y Y=Yes, N=No
F12=Cancel
|
Mostly the screen is same as that of SEU. But there is one parameter that you better
know. In design overlay session, even if you removed the elements, these elements still
remains in the source member with a deleted mark. And if you want to keep them, put N to
Delete removed elements. And if you want to get rid of them, put Y to it and save the
source member.
Save Source Overlay Type choices, press Enter. Source overlay . . . . . . . . . . . PS52R65COK Name, F4 for list
File . . . . . . . . . . . . . . . . QOVLSRC Name, F4 for list
Library . . . . . . . . . . . . . TSTSRC Name, *CURLIB
Text 'description' . . . . . . . . . PS52R65C Delete removed elements . . . . . . N Y=Yes, N=No
F4=Prompt F5=Refresh F12=Cancel
|
Following save option screen, Create Overlay screen comes.
Create Overlay File . . . . . . . . . . . . : QOVLSRC
Library . . . . . . . . . : TSTSRC
Source overlay . . . . . . . : PS52R65COK
Text . . . . . . . . . . . . : PS52R65C
Type choices, press Enter. Create overlay . . . . . . . N Y=Yes, N=No Overlay . . . . . . . . . . PS52R65C Name
Library . . . . . . . . . TSTSRC Name, *CURLIB
Text 'description' . . . . . PS52R65C Include grid . . . . . . . . N Y=Yes, N=No
Replace if exists . . . . . N Y=Yes, N=No
Print overlay . . . . . . . N Y=Yes, N=No
   Authority  . . . . . . . . .   *LIBCRTAUT     Name, *LIBCRTAUT, *ALL
                                                 *CHANGE, *EXCLUDE, *USE
F3=Exit F5=Refresh F12=Cancel
|
If you want to print the overlay , put the Y to "Print overly" with Y in
Create overly.
This is a list of source screen.
Work with Source Overlays File . . . . . . . . . . QOVLSRC Name, F4 for list
Library . . . . . . . . TSTSRC Name, *LIBL, *CURLIB
Source overlay . . . . . *ALL Name, generic*, *ALL
Position to . . . . . . . Starting characters Type options, press Enter.
1=Create 2=Change 3=Copy 4=Delete 6=Print 7=Rename
9=Create overlay Source
Opt Overlay Text Changed LADING1 LADING1 OVERLAY 04/07/00
LADING2 LADING2 OVERLAY 04/06/00
LADING3 LADING3 OVERLAY 04/06/00
LADING4 LADING4 OVERLAY 04/10/00
More...
Parameters or command
===>
F3=Exit F4=Prompt F5=Refresh F9=Retrieve F11=Display names only
F12=Cancel
Source overlay PS52R65COK saved in file QOVLSRC successfully. |
The meaning of each option are below.
Opt
Type the number of the task in the Opt prompt beside
the source overlay you want to perform the task with.
You can type the same option next to more than one
source overlay at a time, and you can also type different options next to different source
overlays at the same time.
1=Create
Creates a source overlay. You can create a new source
overlay. Type 1 in the Opt column, and the name of the source overlay you want to create
in the first line in the list.
Note: Before you create a source overlay, you need to
create a source overlay file by selecting 1 (Create) on the Work with Source Overlay Files
display.
2=Change
Changes a source overlay.
You can change a source overlay and save it with
either the same name or a new name. That is, you can create a new source overlay based on
an existing source overlay using this option. It is also possible to save the source
overlay in a different source overlay file or in a different library. Type 2 in the Opt
column beside the name of the source overlay you want to change.
3=Copy
Copies a source overlay to a new source overlay.
You can also copy a source overlay to another file,
another library, or both. Type 3 in the Opt column beside the name of the source
overlay you want to copy.
4=Delete
Deletes a source overlay from the source overlay file.
You can confirm the choices on the next display before deleting them. Type 4 in the Opt
column beside the name of the source overlay you want to delete.
6=Print
Prints a source overlay.
Type 6 in the Opt column beside the name of the source
overlay you want to print.
7=Rename
Renames a source overlay.
Type 7 in the Opt column beside the name of the source
overlay you want to rename.
9=Create overlay
Creates an overlay object from the source overlay.
Type 9 in the Opt column beside the name of the source
overlay which you want to create an overlay object from.
|
How to use an overlay object
It is very simple.
- Create the Overlay object by option 9 in AFPU or by CRTOVL command. (I always used AFPU
with option 9).
- Set DEVTYPE(*AFPDS) FRONTOVL(xxxxxx)
in printer file by command CRTPRTF/CHGPRTF/OVRPRTF
- CALL PGM
- DLTOVR if you need.
Example
OVRPRTF PS52T65
DEVTYPE(*AFPDS) FRONTOVL(PS52R65C)
CALL PS52R65C
DLTOVR PS52T65 |
2000-6-11 |
